How to Use CHKDSK to Repair Your Drives
What is CHKDSK? A Windows feature to scan and repair drives! Protect your files and boost performance.


Keeping your computer’s drives in top condition is crucial to ensure your data remains safe and your system operates smoothly. Whether you’re dealing with a sluggish hard drive, a corrupted USB stick, or an external drive that won’t open, CHKDSK (Check Disk) is a powerful, built-in Windows tool that can help diagnose and repair issues.

What is CHKDSK?
CHKDSK is a Windows command-line tool designed to check and repair errors on storage devices, including hard disks, solid-state drives (SSDs), USB drives, and memory cards. It scans for issues like bad sectors, corrupted files, or file system errors and can often fix them automatically. Think of CHKDSK as a doctor for your drives—it diagnoses problems and applies repairs to keep your data safe and accessible.
Why Use CHKDSK?
- Fixes Drive Errors: Resolves file system issues that cause crashes or data loss.
- Repairs Bad Sectors: Identifies and marks damaged areas to prevent data corruption.
- Improves Performance: Cleans up drive errors to enhance your system’s speed.
- Protects Your Data: Helps recover files and prevent further damage to your drive.
Using CHKDSK regularly can save you from costly data recovery services or the heartache of losing precious files, such as photos, documents, or work projects.
When Should You Run CHKDSK?
You should consider running CHKDSK if you notice any of these signs:
- Your computer freezes or crashes when accessing files.
- Files or folders disappear or become corrupted.
- Your drive displays errors such as “Disk needs to be formatted” or “Cannot access the drive.”
- Your system is running slower than usual.
- You hear unusual clicking noises from a hard drive (though physical damage may require professional repair).
Running CHKDSK proactively can also help maintain your drives, especially for external devices like USB sticks or SD cards that are frequently connected and disconnected.
How to Use CHKDSK: Step-by-Step Guide
Below are five simple methods for running CHKDSK, each tailored to a different scenario. Whether you’re a beginner or an experienced user, these steps will guide you through the safe repair of your drives. Always back up important data before running CHKDSK, as it may alter or delete corrupted files during the repair process.
Method 1: Run CHKDSK Using File Explorer (Easiest)
This method is perfect for beginners who want a quick, graphical way to check a drive.
- Open File Explorer: Click the File Explorer icon on your taskbar or press the Windows key + E.
- Locate Your Drive: Find the drive you want to check (e.g., C: D: or an external USB drive) under “This PC.”
- Right-click the drive and select “Properties” from the menu.
- Go to the Tools Tab: In the Properties window, click the “Tools” tab.
- Click Check: Under “Error checking,” click the “Check” button. You may need admin rights—click “Continue” if prompted.
- Choose Scan Options: Select “Scan drive” to check for errors. If the system finds any errors, Windows will suggest running a repair.
- Wait for Completion: The scan may take a few minutes to hours, depending on the drive size. Don’t interrupt the process.
- Review Results: Once done, you’ll see a summary. If repairs are needed, follow any prompts to fix errors.
Tip: This method is excellent for non-system drives (e.g., external drives). For the C: drive, you may need to schedule a scan at the next restart. Check out this article to learn how to backup Windows 11 to External Hard Drive.
Method 2: Run CHKDSK via Command Prompt (Standard)
Using the Command Prompt gives you more control over CHKDSK’s options, which is ideal for users who are comfortable with basic commands.
- Open Command Prompt as Admin:
- Press Windows key + S, type “cmd,” right-click “Command Prompt,” and select “Run as administrator.”
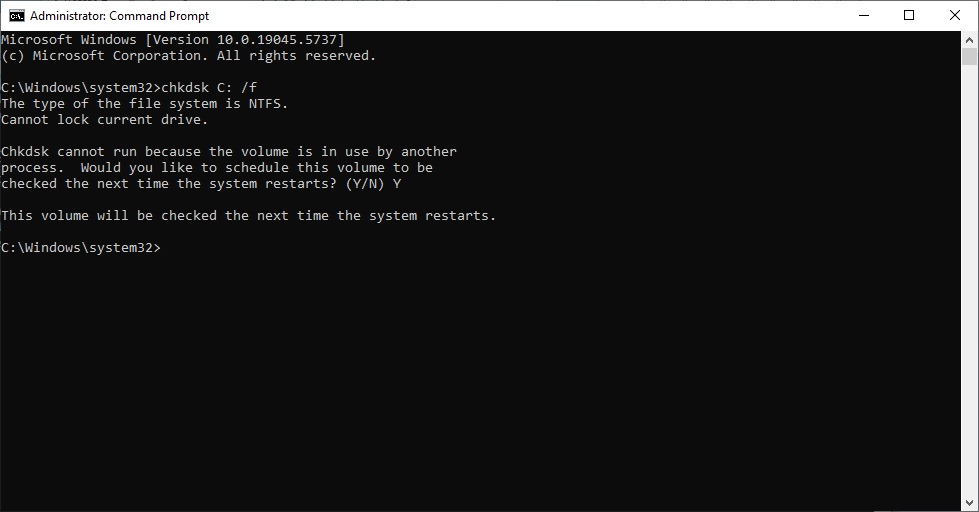
- Type the CHKDSK Command: Enter chkdsk X: /f, replacing “X” with your drive letter (e.g., C: D:). The /f parameter fixes file system errors.
- Press Enter: If the drive is in use (e.g., C:), you’ll be asked to schedule the scan for the next restart. Type “Y” and press Enter.
- Restart if Needed: If prompted, reboot your computer to initiate the scan.
- Wait for Results: The scan will identify and correct any errors that may occur. A summary will appear when complete.
Tip: Use /r instead of /f (e.g., chkdsk X: /r) to locate bad sectors and recover readable data. Note that /r includes /f and takes longer.
Method 3: Run CHKDSK with PowerShell (Advanced)
PowerShell is a more modern alternative to the Command Prompt, offering similar functionality.
- Open PowerShell as Admin:
- Press Windows key + S, type “Powershell,” right-click “Windows PowerShell,” and select “Run as administrator.”
- Enter the CHKDSK Command: Type chkdsk X: /f, replacing “X” with your drive letter.
- Press Enter: If the drive is in use, schedule the scan by typing “Y” when prompted.
- Restart if Required: Reboot to run the scan if needed.
- Check Results: A summary will display any errors found and indicate whether the system has fixed them.
Tip: PowerShell is excellent for users familiar with scripting or those who prefer its interface over Command Prompt.
Method 4: Run CHKDSK in Safe Mode (For Persistent Issues)
If your drive has serious errors or CHKDSK fails in normal mode, try running it in Safe Mode.
- Boot into Safe Mode:
- Press Windows key + R, type “msconfig,” and press Enter.
- Go to the “Boot” tab, check “Safe boot” (select “Minimal”), and click OK.
- Restart your computer.
- Open Command Prompt in Safe Mode: Follow Method 2 steps to run chkdsk X: /f or chkdsk X: /r.
- Review and Restart: After the scan, return to “msconfig,” uncheck “Safe boot,” and reboot to normal mode.
Tip: Safe Mode reduces background processes, making it easier to scan system drives, such as C:.
Method 5: Schedule CHKDSK for Next Boot (For System Drives)
If CHKDSK can’t run because the drive is in use, schedule it for the next restart.
- Open Command Prompt as Admin: See Method 2 for instructions.
- Type the Command: Enter chkdsk X: /f /r, replacing “X” with your drive letter.
- Schedule the Scan: When prompted to schedule the next restart, type “Y” and press Enter.
- Restart Your Computer: Reboot and CHKDSK will run before Windows loads.
- Wait for Completion: The process may take several hours for large drives. Don’t interrupt it.
Tip: This method is ideal for the C: drive, as the system often locks it during regular operation.
Key CHKDSK Parameters
Here are the most common CHKDSK parameters to customise your scan:
- /f: Fixes file system errors.
- /r: Locates bad sectors and recovers readable data (includes /f).
- /x: Forces the drive to dismount before scanning (use with caution).
- /b: Re-evaluates bad clusters (use with /r).
For example, chkdsk D: /f /r fixes errors and checks for bad sectors on drive D:
Tips for Using CHKDSK Safely
- Backup First: Always backup important data before running CHKDSK, as the repair process may remove corrupted files.
- Avoid Interruptions: Don’t stop CHKDSK mid-scan, as it could worsen drive issues.
- Check Disk Health: Use tools like CrystalDiskInfo to monitor drive health after CHKDSK.
- Run Periodically: Schedule CHKDSK monthly for external drives to catch problems early.
- Seek Professional Help: If CHKDSK can’t fix the drive or you hear physical noises (e.g., clicking), contact a data recovery expert.
Common CHKDSK Scenarios
- USB Drive Not Opening: Run chkdsk X: /f to fix file system errors causing access issues.
- Slow Computer: Scan the C: drive with chkdsk C: /f /r to repair errors slowing performance.
- Corrupted Files: Use chkdsk X: /r to recover readable data from bad sectors.
- External Drive Errors: Use Method 1 via File Explorer for a quick check on USB or external drives.
Conclusion
CHKDSK is your go-to tool for repairing drive errors and maintaining data integrity. With five easy methods to run it—whether through File Explorer, Command Prompt, PowerShell, Safe Mode, or scheduled scans—you can tackle any driving issue with confidence. By following these steps and tips, you’ll protect your files, boost performance, and avoid the stress of data loss. Start using CHKDSK today to keep your drives in top shape!
