How to Back Up Windows 11 to an External Drive
Protect your data and restore your system anytime by saving backups to an external hard drive—simple, secure, and stress-free.

Backing up your Windows 11 computer to an external drive is one of the best ways to keep your data safe. Whether it’s your photos, documents, or system settings, a proper backup can protect you from data loss due to system failure, theft, or malware attacks.
We will provide step-by-step instructions on how to back up Windows 11 to an external drive using simple and effective methods.
Why You Should Back Up Windows 11
Before jumping into the steps, let’s look at why backing up is so important:
- Data Protection: You can restore your essential files in case of accidental deletion, hardware failure, or a malware attack.
- System Recovery: If your system crashes, you can restore Windows 11 to a previous state without losing your settings.
- Peace of Mind: Knowing your files are safe lets you use your PC confidently.

What You Need to Get Started
Having the right tools before starting the backup process ensures a smooth experience.
- A reliable external hard drive or SSD with enough space
- A Windows 11 PC
- Admin access to your system
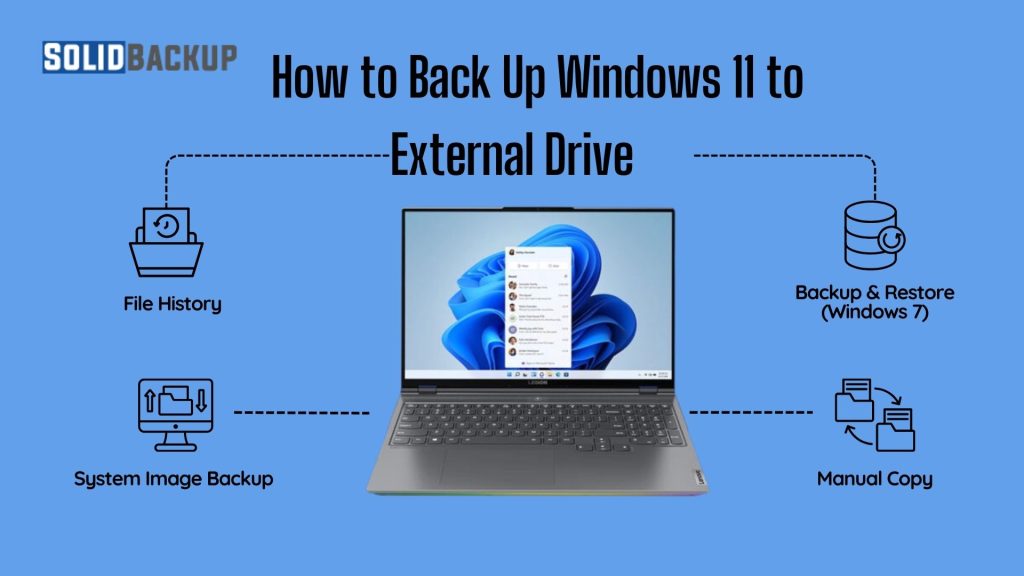
Method 1: Using File History
File History is a built-in Windows 11 feature that automatically backs up your files in selected folders. It’s easy to set up and runs in the background.
Step 1: Connect the External Drive
Plug your external hard drive or SSD into a USB port on your Windows 11 PC. Wait until Windows recognises the drive.
Step 2: Open File History Settings
1. Click the Start button.
2. Type “Control Panel” and press Enter.
3. In the Control Panel, select System and Security.
4. Click File History.
Step 3: Turn On File History
- Click “Turn on” if File History is off.
- Choose your external drive from the list.
- Click “Run now” to manually start the first backup.
Step 4: Customise Backup Settings (Optional)
- Click Advanced Settings to change how often backups happen and how long the system keeps files.
- Click Exclude folders if you want to skip backing up specific folders.
Method 2: Using Windows Backup and Restore (Windows 7)
This classic tool still works in Windows 11 and offers more control. It’s great for users who want to include system images in their backups.
Step 1: Open Backup and Restore
1. Open Control Panel.
2. Go to System and Security > Backup and Restore (Windows 7).
Step 2: Set Up Backup
1. Click Set up backup on the right.
2. Select your external drive as the destination.
3. Choose whether Windows should choose what to back up or if you want to select files manually.
Step 3: Schedule the Backup
- Choose a backup schedule (daily, weekly, or monthly).
- Click Save settings and run backup to start.
This method also allows you to create a system image, a complete copy of your Windows installation.
Method 3: Creating a System Image Backup
A system image backup lets you restore your entire system, including files, apps, and settings.

Step 1: Open the System Image Backup Tool
1. Open Control Panel.
2. Go to System and Security > Backup and Restore (Windows 7).
3. Click Create a system image on the left.
Step 2: Choose Backup Location
- Select your external drive as the backup location.
- Click Next and confirm the drives to include.
- Click Start backup.
Step 3: Create a System Repair Disc (Optional)
After creating the system image, Windows may prompt you to create a system repair disc. A system repair disc is helpful if your system won’t start.
Method 4: Manually Copy Important Files
Do you prefer something fast and flexible? Manually copying files is a simple approach to backing up documents, pictures, and other personal data.
Steps:
1. Open File Explorer.
2. Browse to folders like Documents, Pictures, Videos, and Desktop.
3. Select the files you want to copy.
4. Paste them into the external drive.
This method is quick but doesn’t back up system settings or programs.
Tips for a Successful Backup
Want your backups to work reliably every time? These practical tips will help keep your data safe and your backups hassle-free.
- Label your drive: Give your external drive a unique name to quickly identify it during backup.
- Eject safely: Always use “Safely Remove Hardware” before unplugging your drive.
- Check space: Make sure your external drive has enough free space for the backup.
- Update regularly: Set a reminder to update your backup weekly or monthly.
Conclusion
Backing up your Windows 11 PC to an external drive is a smart and simple way to protect your data. You can use built-in tools like File History or Backup and Restore or manually copy your files. Whichever method you choose, make sure you back up regularly. It’s better to be safe than sorry regarding your valuable information.
